
Steve's Guide to Family Photos
Steve Thode, stlewisoil@yahoo.com

Last updated April 10, 2020
I've been taking family photos for more than 30 years and I want to share some lessons I have learned along the way. I am not an expert photographer, but family photography is not about experts. It's about a parent taking meaningful photos of your children so you can save and share them throughout the years. My advice here is not about technique. It's about coming up with your own system to save, organize and share your family photos. (Why take family photos if you can't keep, find and share them later?) Before I close, I’ll also offer some suggestions for taking the right kinds of photos that I think you will come to value as the years go by.
One word of caution. I am intense about family photos, but I am not trying to impress or intimidate anyone here. Anyone can do the things with family photos that I describe here. Read this and just take the ideas that work for you. What's more, it's never too late to get organized in how you save your photos. You can catch up with your older photos later if you want. You have to start somewhere and, as Anne Lamott’s father said, it’s “Bird by bird.” One photo at a time. Start with last month’s photos--and then work backward and forward.
The Short Version: 7 Steps to Organized Photos
There’s a lot here, but here’s the short version, summed up in 7 steps.
Get your photos off your phone and out of the cloud every month. Load them onto a hard drive.
As you’re putting them onto your hard drive, group them into albums, trying (where possible) to limit them to more than 200 photos, grouped by activity or event.
Give names to each album, always starting with the year and month followed by a brief description of the activity or event. (Example: “2020-04 Easter,” “2020-03 Steve’s Birthday”)
For busy months, add letters (A, B, C) to distinguish between the albums. (Example: “2020-04 A Easter,” “2020-04 B Judy’s Birthday”)
Upload your albums to Shutterfly, giving the albums the same names so your photos are stored in a consistent system across your storage systems. (“OK Boomer.”)
Download the Shutterfly app to your phone so now all your photos are backed up and available on your phone.
Work forward and backwards, creating albums every new month and going back in time to save your photos, month by month.
Saving and Organizing Your Family Photos: Why
It’s great to take a lot of pictures, but they will be more valuable to you, your children, their children and beyond, if you save them in an organized way. Commit to a system to save your pictures (and videos) in an organized system so you can both preserve and find your images for generations to come.
Coming up with a single, organizing system is only the first step. You want to use that same system to organize your pictures AND then save your photos with that consistent system, using different technologies (cloud, hard-drive, etc.). If 30 years of picture-taking have shown me one thing, it’s this. The devices used to store and preserve images are constantly changing: from slides and negatives to jPegs and CDs and now hard drives and the cloud.
When my son, Ted, was born in 1986, I took a class at the local hospital for new parents about saving, organizing and sharing photos of your children. The class was not about technique, but its lessons changed my life as a photo-taking parent. Back then, the class focused on preserving negatives which were used in film cameras. In the days of film, the first lesson of saving your images was simple: take care of the negatives. (I have all my negatives, stored and numbered in archival safe, plastic pages, stored in numerical order across several binders. Each binder is marked with the starting and ending dates for the negatives within the binder.)
Before negatives, there were slides. My parents and grandparents had hundreds of them in boxes and carousels. When digital images were first taking hold, you could get prints from your film and order a CD with the images stored on them. Digital camera cards and memory sticks followed. As smart phones became the camera of choice, taking photos changed forever (again). The cloud makes it simple with photos automatically uploaded to free up storage on your phone.
I don’t mean to sound like Father Time, but the cloud won’t last forever. Something else will come along. In the meantime, you could lose access to the cloud service you’re now using--and what about all those pictures you took before the cloud, stored somewhere on an old computer or hard drive.
3 Principles of Saving and Organizing Family Photos
Create dated, monthly albums for your photos
Store those dated albums across several different technologies
Work forward and backward
1. Create Dated, Monthly Albums for Your Photos
Over time, I have come to realize that the most important thing you want to know about an old photo is when it was taken. First grade, second grade, third grade? You may not be able to remember which one unless you have the date. The good news is that digital images are now marked with the date when they were taken--and you should use this feature to your advantage in setting up a consistent filing system for your images.
Saving your images starts with organizing them into albums or folders. If you use an iPhone or any photo service like Google Photo or Shutterfly, it’s very easy to sort your images (and videos) by date.
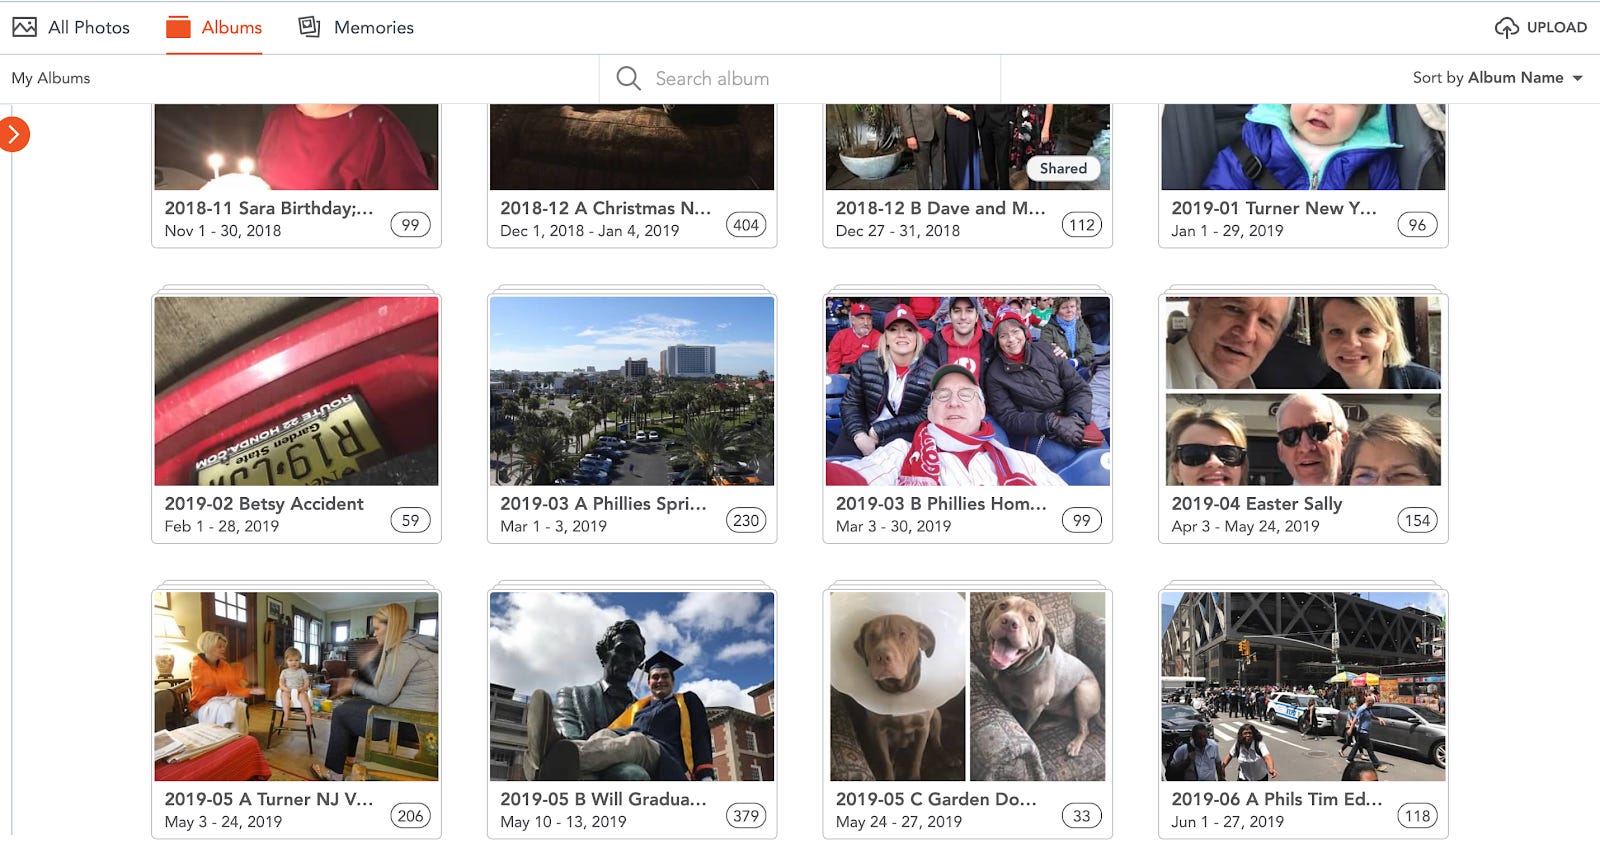
In my filing system--which I’d recommend you follow--the name of each album always begins with the date: year followed by month. (“2019-12” for December; “2019-11” for November, etc.) I add further descriptions to the name of the albums, but I always start the name of the album with the year and month. (“2019-12 Christmas,” “2019-11 Thanksgiving,” etc.)
HELPFUL HINT #1: LIMIT ALBUMS TO 200 IMAGES
If you take a lot of pictures (who doesn’t?), I recommend that you try (where possible) to limit each album in your filing system to 200 photos. It’s an arbitrary number, but it helps me from having albums so big that I can’t find a photo if it’s from a month like December where I take lots of photos. I start the album name with the year and month and add an letter (A, B, C, etc.) for additional albums. (“2019-12 A Christmas Morning,” “2019-12 B Christmas Dinner” etc.)
HELPFUL HINT #2: GETTING IMAGES OFF YOUR PHONE
If you’re still reading and you have your photos on your iPhone, I can hear you thinking: Why do I need to do all this? My photos are backed up on the cloud. With the cloud, I can get them from my other devices and they’re already sorted by date.
That’s a fair point, but I hate the idea of being dependent on a cloud that’s controlled by a corporation. What if they fold? (Before Shutterfly, I used to store my photos on KODAK’s Online Gallery. Remember KODAK? They went bankrupt--and were bought out by Shutterfly.)
I recommend you get your pictures off your phone and out of the cloud, storing them in albums organized by year and month as explained above.
To get your photos off your phone, I recommend putting them on a hard drive. To get them there, I recommend buying a flash drive that you can plug directly into your phone. They’re available on Amazon for $50. Armed with this flash drive, when you take your photos off your phone, you do it month by month, creating dated albums in your hard drive as you go, adding descriptions and breaking them down into the A, B and C of each given month.
2. Store Those Dated Albums Across Several Different Technologies
Beyond your hard drive and cloud storage that you may buy from Apple, I recommend also using Shutterfly. It’s free to open an account and you can share your images (and albums) with anyone else who has a Shutterfly account. You can easily order prints and other products--but it’s also a back-up storage place if something happens to your cloud account with Apple. It’s also free, unlimited storage. In addition, if you get the Shutterfly app, whether desktop or mobile, on any device, you have access to all your images. The other good news is that with the Shutterfly app on your phone, it’s very simple to upload any and all images from your phone. Again, use the same filing system with the dated albums in your Shutterfly account matching the dated albums on your phone.
MY MONTHLY ALBUMS LOADED ONTO HARD DRIVE

THOSE MONTHLY ALBUMS UPLOADED TO SHUTTERFLY
THOSE SAME MONTHLY FOLDERS ON THE SHUTTERFLY APP ON MY PHONE

3. Work Forward and Backward
After you get a hard drive and a Shutterfly account and your system is up and running, you can begin to work forward and backward in time. Going forward, organize each month’s photos into albums on your hard drive and then upload them from the hard drive to Shutterfly.
Working backward, go through the photos on your phone, month by month, putting them in dated albums on your hard drive and uploading those albums to Shutterfly and your hard drive.
Next, go through your old devices and memory cards to find the images you may have there.
Upload them to Shutterfly and your hard drive, using dated albums.
After that scan old images. There’s something called a Doxie scanner which you can get on Amazon for about $150. It’s great. It’s the size of a rolling pin. You stick a photo in and Doxie scans it in :10. If that’s too much work, do NOT just take an iPhone image of your old prints.
Google has a great scanner app (PhotoScan) which was recommended to me by a friend, Neal Carter. It actually takes 5 images of your photos and merges them together into one scan with no glare. The jPeg quality is not bad--and this is WAY BETTER than just taking a single image of an old photo from your phone.
I am intense about saving my images. From my film days, I have all my negatives, in numbered and dated binders. I used to print out all my images and store them in numbered photo albums.
Slowly, over time, I am now going back through those albums to scan the old images and store them in new digital albums. (I have 900 images per album; I have 35 albums and have scanned the images in 5 of them. Bird by bird.)
After negatives and before smart phones, I used to save each digital folder onto a CD. (I know that CDs are outdated, but I like the idea of having something permanent and tangible like a CD as my primary back-up. My old CDs are stored in binders and each one is numbered—with numbers that match my digital filing system.)
My hard drive is also backed up with a cloud-based subscription service called Carbonite. It saves everything on my hard drive and our home desktop including documents and videos. If your hard drive breaks (mine did once), lost or destroyed in a fire or flood, your photos and other online stuff are safe.
I do not use my phone to take a lot of videos, but the same principles discussed here apply to videos as well as photos. When you save your pictures, save your videos—again within a consistently-named, date-based file system.
The same systems here can also apply to older and historic family photos. For example, my father and grandfather had their family photos developed as slides. Over the years, I have sent these old family slides to a transfer service. I used DigMyPics. They did a great job. The service transferred the slides to CDs. I added these CDs to my system and all the images from the slides are backed up on hard drive and accessible to me anywhere via Shutterfly—all in consistently-named digital albums. For old family prints, I use my Doxie scanner to save the images. Once scanned, I put them in consistently-named digital folders and save them across multiple formats. If I don’t know the date or don’t have a month, I just take a guess in naming that album. Example: “1964 Seaford Ginny, Susan, Steve.”
Taking Ritual and Family Photos
Beyond saving and organizing your images, here are some thoughts on the types of pictures that you should take.
Take Annual Ritual Photos
Family photos capture children in the moment, but one special way to show the passage of time is to take the same photo at the same time every year, capturing the same moment through the years. I call these "ritual photos." So, for example, every year at Christmas, my children knew that after the presents are open, they needed to pose for their "stocking photo." Every year, I took a photo of each child, holding his or her stocking in front of the tree. At every birthday, there was also a photo with each child sitting behind a birthday cake with candles. Before they blew out the candles, I took a photo. On the first day of school, there was another ritual photo on the top step of the stoop. You can create your own ritual photos: once a year on a specified date, once a month on the first of the month, four times a year on the first day of each new season.
The ritual is up to you—but getting into the habit and routine of taking them means you will have a series of meaningful photos that show the passage of time as your child grows up.
Take Ritual Photo with Each Parent, Separately and Together
In taking ritual photos, it's also a good idea to try to take at least one yearly photo showing your child with both parents--and with each parent individually. There are times when you will want to remember your child with just one parent (on Father's Day and Mother's Day, for example).
When my kids were growing up, I was the family photographer--and. without smart phones, cameras weren't everywhere. That meant, I ended up taking all the photos—and I wasn’t in a lot of them. At the end of every beach vacation, I would pose alone at the water's edge with each of my children. In this way, there is at least one photo of me with them each year and this ritual photo was another way to show them growing up through the years.
Take Family Group Photos
With smart phones and cheap, portable tripods/selfie-sticks, it’s very easy to take a group picture. A company named Blitzwolf makes a portable tripod that’s also a selfie-stick. It comes with a wireless button that you can use with bluetooth to take pictures on your phone. You can buy them on Amazon for about $25. It’s a worthwhile investment. Again, I have tried to set up group photos as ritual events that become part of the annual routine. So, for example, when my daughter Annie was first born, I started taking an extended, family photo at my parents' house when my family of origin gathered for Christmas. Through more than 30 years, this family photo shows the growing and changing family. Taking that photo became part of our holiday routine whenever the extended family got together at Christmas. It’s a treasure now--and I can find each image in just a few minutes from any device.
Enjoy every moment.
With love,
Steve